


Views: 0 Author: Site Editor Publish Time: 2026-09-11 Origin: Site


You are ready for a DIY project, but the spray paint aisle seems confusing. Should you just pick any can? That often causes paint to peel and wastes your effort. The right spray paint is not just about color. You need to match the paint's formula to your surface and where it will go.
This guide explains the selection process by surface type, finish, and durability. You will learn how each factor affects your final result. With this knowledge, you can pick the right can on your first try. Successful spray painting starts with understanding these basics. You will achieve professional-looking results without guessing or frustration. Your projects will look polished and last longer.
Match the paint type to your surface. Metal needs enamel or acrylic. Wood needs flexible acrylic. Plastic needs special paint.
Prepare the surface first. Clean it well. Sand glossy areas. Use the right primer. This step stops peeling and rust.
Choose the right finish. Gloss gives the most protection. Satin hides flaws. Matte looks modern but marks easily.
Use thin coats. Apply several light layers. Wait for each coat to dry. This method prevents drips and gives a smooth look.
Pick a trusted brand. Quality brands give consistent color and spray. This choice ensures a professional finish.
Consider the environment. Outdoor projects need UV and moisture protection. Indoor projects can focus on looks.
Special paints solve special problems. Use high-heat paint for grills. Use flexible paint for plastic. Use glass paint for glass.
Follow the drying times. Acrylic dries in hours. Enamel takes a day. Patience leads to a durable finish.
Before you pick up any can, you need to know what is inside. The paint's chemistry controls how it dries, how it sticks, and how long it lasts. Three main types fill the shelves: enamel, lacquer, and acrylic. Each one works best for different jobs, and knowing the difference stops you from getting bad results.
Enamel paint forms a hard, strong layer once it dries. Pick this type for surfaces that get heavy use or bad weather. Think outdoor furniture, metal railings, or garage doors. Enamel takes the longest to dry, often needing a full day before the surface feels safe to touch. The wait is worth it because the finish resists chipping and fading much better than other types.
Lacquer dries very fast, usually within 10 to 30 minutes. This speed makes it great for projects where you want several coats in one afternoon. But lacquer is more fragile than enamel. It works well on indoor items like decorative pieces or model crafts. Stay away from lacquer on surfaces that bend or get hit, since it tends to crack instead of flex.
Acrylic paint finds a middle ground between toughness and simple use. It dries in about 2 to 4 hours, giving you enough time to fix mistakes without waiting long. Acrylic sticks well to many surfaces, including metal, wood, and some plastics. This flexibility makes it the top pick for general DIY projects. Many hardware stores keep acrylic spray paint as their usual choice because it works well in many situations.
Paint Type | Drying Time Range (minutes) |
|---|---|
Enamel | 480 – 1440 (8–24 hours) |
Acrylic | 120 – 240 (2–4 hours) |
Lacquer | 10 – 30 |
The nozzle controls how much paint comes out and how wide the spray spreads. A small nozzle gives a fine mist, perfect for detailed work or small fixes. A big nozzle covers more area quickly, which works well for large panels or fences. Most cans come with a standard nozzle, but you can find ones with different opening sizes for special jobs.
Your method matters just as much as the nozzle. Hold the can about 8 to 12 inches from the surface. Move your arm smoothly from side to side, starting the spray before you reach the target and stopping after you pass it. This motion stops paint from piling up at the start and end of each pass. Overlap each stroke by about one-third to get even coverage. The transfer efficiency of your nozzle affects how much paint actually lands on the surface versus floating into the air. Airless and HVLP systems reach higher efficiency rates, but for spray cans, your distance and speed control the result.
The finish controls how light bounces off your painted surface. Gloss gives a shiny, reflective look that also fights off moisture and stains. Satin sits in the middle, offering a soft shine that hides small flaws. Matte gives a flat, dull look that feels modern but shows marks more easily. Beyond looks, glossier finishes usually protect better because they form a tighter surface.
Textured spray paint adds a physical pattern to your project. Hammered finishes create a bumpy look that hides scratches and fingerprints. Wrinkle finishes make a crinkled texture that adds grip. These choices work well for toolboxes, equipment covers, or anything that needs extra toughness without showing wear. The texture also helps hide surface flaws that would stand out under a smooth gloss.
This section helps you decide. Before you buy a can, answer three questions. What is your surface made of? Where will the painted item be? How much wear and tear will it get? Your answers will lead you to the right product each time. Do not skip this step. Picking a can randomly leads to paint peeling, colors fading, and wasted money.
Start with your surface. Each material has a different makeup. The paint must bond with that makeup to last for years.
For metal, your main problem is rust. Bare metal rusts fast when moisture touches it. You need a primer that blocks rust, then a paint that seals out moisture. Enamel or acrylic spray paint works well here because both form a tight barrier. The best spray paint for metal includes rust blockers in the formula. Always prime bare metal first or you will see orange spots within months.
For wood, your problem is movement. Wood expands and shrinks with humidity changes. A rigid paint cracks under this stress. Acrylic spray paint works best on wood because it stays flexible. You also need a primer that seals knots and stops tannins from bleeding through the final color. Without primer, dark spots will show on your painted surface over time.
For plastic, the challenge is sticking. Plastic has a smooth, non-stick surface. Paint beads up and flakes off without special treatment. You need a spray paint made for plastic, or you must use a plastic adhesion promoter first. Lightly sanding the plastic with fine-grit sandpaper also helps the paint grip.
For glass, sticking is even harder. Glass is non-porous and very smooth. You need an etching primer that bites into the glass surface with chemicals. Some glass paints need baking in a household oven to cure fully. Without this step, the paint scratches off with light contact.
Where your project lives decides how long the paint lasts. Indoor projects face mild conditions. They stay out of direct sun, rain, and extreme temperature changes. Any decent spray paint works indoors as long as you prepare the surface correctly.
Outdoor projects need serious protection. Sunlight fades colors. Rain and humidity cause rust and peeling. Temperature changes make materials expand and contract. You need paint with UV protectors and moisture resistance. The table below shows typical outdoor lifespans for different surfaces.
Surface Type | Average Outdoor Lifespan (Properly Prepared) |
|---|---|
Metal (with primer and topcoat) | 3 to 10 years |
Wood (treated and sealed) | 2 to 5 years |
Metal lasts longer outdoors when you use primer and a quality topcoat. Wood needs more frequent repainting because it absorbs moisture and breaks down faster. In humid climates, expect the lower end of these ranges. Moisture is a key factor that reduces lifespan on both surfaces.
If your project stays indoors, you can focus on looks. You do not need the toughest enamel or the most UV-resistant formula. Choose a satin or matte finish that looks modern and matches your decor. You save money and get a nicer look.
For outdoor projects, focus on protection. Choose gloss finishes because they create a tighter surface that resists moisture. Always prime metal surfaces to stop rust before you apply color. Use a clear topcoat for extra shielding on high-exposure items like garden furniture or railings.
Color choice affects more than looks. Dark colors absorb heat and may dry faster in direct sunlight. Light colors show dirt more easily but reflect heat. Bright reds, yellows, and oranges often need extra coats to cover completely. Plan for this when you buy paint.
Coverage affects your budget. A standard can of spray paint covers about 10 to 15 square feet. Larger projects need multiple cans. Always buy one extra can from the same batch. Different production batches can have slight color differences. Running out mid-project and grabbing a different batch may leave you with a visible line.
Drying time affects your schedule. Acrylic spray paint dries in 2 to 4 hours, letting you apply several coats in one day. Enamel takes 8 to 24 hours to dry fully. If you work on a tight timeline, acrylic gives you flexibility. If you need maximum toughness, enamel is worth the wait.
The best spray paint for your project balances these three factors. For a quick weekend furniture flip, choose acrylic. You get good looks, fast drying, and easy cleanup. For an outdoor metal gate that faces rain and sun, choose enamel with rust protection. You get years of reliable service.
Ask your three questions first. Surface. Environment. Durability. Then pick your color and finish. This order saves you time, money, and frustration. You achieve professional results on your first try.
Metal projects need extra care. Unlike wood or plastic, metal rusts when moisture touches it. You must pick products that stop this reaction. You also need to prep the surface the right way. The correct method turns a plain metal item into a strong, good-looking piece that lasts for years.
Rust happens when iron meets oxygen and water. This chemical reaction slowly eats through metal. A rust-blocking spray paint stops this by forming a shield. These products have special additives that stop rust from forming. Look for labels that say "rust preventive" or "rust inhibitive" on the can.
Choose enamel-based options for outdoor metal. Enamel dries into a hard shell that keeps moisture out completely. Acrylic formulas work well for indoor metal items that stay dry. Both types stick well when you use them on clean, prepped surfaces.
The best spray paint for metal has corrosion blockers in its mix. These chemicals fight rust even if the surface gets scratched. You pay a bit more for this safety. The extra cost saves you from repainting in a year or two.
Regular spray paint fails on hot surfaces. Heat makes it bubble, peel, and change color. You need a special high-heat formula for these jobs. Engine blocks, exhaust pipes, grills, and fireplace screens all get hot enough to ruin normal paint.
High-heat spray paint uses silicone resins. These materials handle extreme heat without breaking down. Most formulas handle temperatures up to 500°F all the time. Some premium versions resist up to 2,000°F for short bursts. Check the label to match the product to your heat source.
Put on high-heat paint in thin, even layers. Thick layers trap heat and cause bubbling. Let each coat dry fully before adding another. After the last coat, cure the paint as the label says. Most need a slow heating process to reach full hardness. This step stops early peeling when you first use the grill or start the engine.
Never skip primer on bare metal. Primer does two key jobs. First, it bonds tightly to the smooth metal surface. Second, it gives the topcoat something rough to hold onto. Without primer, your color coat peels off in big sheets within months.
Bare metal needs a primer with rust blockers. These primers bite into the metal surface at a tiny level. This biting creates a strong bond that keeps out moisture. Put on primer right after cleaning the metal. Bare metal starts to oxidize within hours of hitting the air.
Use a self-etching primer for the strongest grip. These products have acids that eat into the metal surface. They work especially well on aluminum and stainless steel. Regular primers struggle on these slick surfaces. Self-etching formulas create the hold you need for lasting results.
Galvanized metal brings a special problem. The zinc coating that stops rust also stops paint from sticking. Regular primer slides right off this slippery surface. You need an etching primer made for galvanized steel.
Etching primers contain phosphoric acid. This chemical reacts with the zinc surface. The reaction creates a rough, porous layer that paint can grab. Put on a thin coat and let it dry fully. Then add your regular primer and topcoat as usual.
You can also use a product called "galvanized metal primer" from specialty brands. These formulas skip the separate etching step. They mix the etching agent and primer in one product. This saves time and lowers the chance of mistakes.
Your topcoat gives the final defense against weather. Pick a product that matches your primer system. Enamel topcoats pair well with enamel primers. Acrylic topcoats work with acrylic primers. Mixing systems can cause sticking problems between layers.
Put on two to three thin coats instead of one thick coat. Thin coats dry faster and smooth out better. They also lower the risk of drips and sags. Wait the suggested time between coats. This wait lets each layer release solvents before the next coat seals it in.
For outdoor metal, pick a gloss finish. Gloss creates the tightest surface shield. It also reflects UV rays that cause fading. Satin and matte finishes look nice indoors but give less protection outside.
A clear topcoat adds another layer of safety. This clear coating seals your color coat from moisture and UV damage. It also gives a deeper, richer shine to metallic and pearl finishes.
Put on clear coat after your color coat dries fully. Use the same brand family for the best match. Different brands use different solvent systems. Mixing brands can make the clear coat wrinkle or cloud the color underneath.
Clear coats come in gloss, satin, and matte versions. Choose gloss for the most shine and safety. Pick satin or matte to tone down a bright color or match a certain look. Some clear coats have UV absorbers that slow color fading. These cost more but make outdoor projects last much longer.
Proper prep stays the base of every successful metal painting job. Clean the surface well with degreaser. Sand shiny areas to create grip. Use the right primer for your metal type. Then build your color and clear coats in thin layers. This process takes time but gives professional results. Your painted metal will resist rust, fading, and peeling for years to come.
Wood moves with humidity changes. The wrong paint cracks as wood expands and contracts. The right approach gives you a smooth, lasting finish that stays intact through seasonal changes.
Chalk paint creates a flat, matte finish with a soft texture. This look suits farmhouse-style furniture and antique reproductions. Chalk paint sticks well to wood without heavy sanding. You can distress it by sanding edges after painting to create an aged appearance. This paint dries quickly, often within one hour. Seal chalk paint with wax or a clear topcoat. Without sealing, the finish marks easily from regular contact. For decorative pieces, chalk paint is the best spray paint choice you can make.
Chalk paint works best for indoor furniture that sees light use. Decorative shelves, picture frames, and accent tables benefit from this finish. For high-contact surfaces like tabletops, pair chalk paint with a durable clear sealer.
Multi-surface spray paint bonds to wood, metal, and plastic in one can. This type saves you from buying separate primers for mixed-material projects. The best spray paint for wood furniture often falls into this multipurpose category.
Acrylic multi-surface paint forms a flexible bond that moves with wood. This flexibility prevents cracking as humidity changes. Rust-Oleum 2X Ultra Cover and Universal Spray Paint provide this versatility for common furniture flips. Their formulas suit wooden chairs, cabinets, and shelves. They deliver even coverage and good adhesion. Choose gloss or satin for kitchen tables and children's furniture. These finishes resist stains and clean easily. Use matte for decorative pieces where you want a modern look. The best spray paint for wood combines durability with easy application.
Primer creates a uniform base for your color coat. On wood, primer fills tiny pores and gives paint a surface to grip. Without primer, wood absorbs paint unevenly. The final color appears blotchy with light and dark patches.
Wood knots contain resin that bleeds through paint over time. This resin creates yellow or brown stains on your finished surface. Seal these knots before you prime to stop this problem.
Start by sanding the entire piece with 120-grit sandpaper. Sand in the direction of the wood grain to avoid scratches. Wipe away all dust with a tack cloth. Apply a stain-blocking primer over the knots. Shellac-based primers work best for blocking resin. After sealing the knots, apply one even coat of primer to the whole piece. This step ensures your color coat applies evenly and smoothly.
A perfect finish comes from technique. A spray paint for wood still needs careful application. Hold the can eight to twelve inches from the surface. Move your arm in straight, parallel passes. Start each pass before you reach the edge of the piece. This motion prevents paint buildup at the edges.
Thick coats cause runs and drips. Each coat should look like a light dusting of color. You should still see the previous coat through the new layer. Apply three to four thin coats for full coverage. Wait the recommended drying time between each coat. This wait prevents the next coat from softening the layer underneath. Spray painting wood furniture this way gives you a hard, uniform finish.
Work in a space between 50°F and 85°F. Avoid painting on humid or rainy days. A dry, ventilated workspace gives you the best results.
Plastic is one of the hardest surfaces to paint. Its smooth, non-porous surface pushes paint away like water off a duck's back. You cannot just grab any can and expect it to last. The wrong product beads up, flakes off, or never dries right. Knowing why plastic resists paint helps you pick the right method from the start.
Paint sticks to a surface through mechanical grip and chemical bonding. Wood and metal have tiny pores or rough spots that give paint something to hold. Plastic lacks these features. Its surface is slick and sealed. Standard paint formulas cannot get into or grip this smooth surface.
Plastic also has release agents from the molding process. These chemicals help parts pop out of factory molds but leave a film that blocks paint. Also, plastic bends and expands with temperature changes. A stiff paint layer cracks under this movement. Specialized plastic paints have flexible resins that bend with the material instead of breaking.
The best spray paint for plastic has adhesion promoters in its mix. These additives create a chemical bond with the plastic surface. They also stay flexible after drying. This flexibility stops cracking when your project heats up or cools down.
Preparation matters more than the paint itself. Start by washing the plastic with warm water and dish soap. This removes grease, dirt, and mold release agents. Dry the piece fully with a lint-free cloth.
Next, scuff the surface with fine-grit sandpaper. Use 400-grit or finer to avoid deep scratches. Lightly sand the whole area you plan to paint. This creates tiny roughness that gives paint a mechanical grip. Wipe away all sanding dust with a tack cloth. Do not touch the sanded surface with bare fingers. Skin oils ruin all your prep work.
Apply a plastic-specific primer after cleaning and scuffing. These primers bond chemically with the plastic and create a good base for color. Some products mix primer and paint in one step. These work well for small projects or touch-ups. For larger pieces, separate primer and color coats give better results.
Your color coat needs protection, especially on items that get regular use. A flexible clear topcoat adds durability without hurting the paint's ability to move with the plastic. Look for products labeled "flexible" or "for plastic" to make sure they work together.
Apply two thin coats of clear sealer after your color dries fully. This extra layer resists scratches, UV fading, and moisture damage. It also gives an even sheen across the whole surface. Choose gloss for a shiny, protective finish. Pick matte or satin to keep a subtle, natural look.
Curing time matters more with plastic than any other surface. Even after paint feels dry to the touch, the solvents need time to evaporate fully. Wait at least 24 hours before handling your project. Wait a full week before exposing it to heavy use or outdoor conditions. This patience ensures the best adhesion and maximum durability.
Krylon Fusion All-In-One Spray Paint works well for plastic projects when you follow these prep steps. Its formula gives good coverage and dries fast. For DIY fans working on plastic furniture or automotive trim, this product delivers steady results. Remember that no spray paint can fix poor surface prep. Clean, scuff, and prime correctly, and your plastic project will look professional for years.
Glass and ceramic are tricky to paint. Their surfaces have no pores. Paint cannot soak in like it does with wood. Instead, it must stick using a chemical bond. Without the right products and prep, your paint will peel or scratch off in days.
Regular spray paint fails on glass and ceramic. The smooth surface pushes the paint away. You need products made for these materials. Look for labels that say glass, ceramic, or tile on the can. These formulas have special resins that grip non-porous surfaces.
You have two main ways to change how glass looks. Staining adds a see-through color that lets light pass. Painting adds a solid layer that blocks light fully. Each method serves a different goal.
Glass stains work like dyes. They sink into the surface at a tiny level. The result looks like colored glass, not painted glass. Stains work well for windows, vases, and decorative panels where you want light to shine through. They also resist scratches better because the color sits inside the surface.
Painting glass gives you full coverage. You can make solid colors, patterns, or designs. The paint forms a layer on top of the glass. This method works well for backsplashes, candle holders, or any project where you want no light to pass through. The best spray paint for glass projects often comes in acrylic formulas that dry to a hard, durable finish.
Preparation decides your success. Glass needs deep cleaning before any paint touches it. Use a glass cleaner or rubbing alcohol to remove every trace of oil and dirt. Even a fingerprint can cause paint to fail later.
Adhesion promoters create a bridge between glass and paint. These clear liquids contain chemicals that bond with the glass surface. They leave a tacky layer that paint can grip firmly. You apply them right before your primer or color coat.
Spray the adhesion promoter evenly across the cleaned surface. Wait the time listed on the label, usually a few minutes. The surface should feel slightly sticky but not wet. Then apply your primer or paint directly over this layer. This two-step process greatly improves paint durability on glass.
For ceramic surfaces, you may need an etching primer instead. These primers contain mild acids that roughen the glossy surface at a tiny level. This roughness gives paint something to hold. Use them on glazed ceramic tiles or pottery that has a shiny finish.
Curing changes your paint from a soft film into a hard, durable surface. Unlike regular drying, curing involves a chemical reaction. This reaction takes time and sometimes heat. Skipping this step leaves your paint open to scratches and water damage.
Baking your painted glass or ceramic creates the strongest bond possible. This process works well for items that need regular washing. Mugs, plates, and serving dishes benefit from this extra step.
Place your painted item in a cool oven. Set the temperature to 350°F. Once the oven reaches temperature, start your timer. Bake the item for 30 minutes. Turn off the oven and let the item cool completely inside. Do not remove it while hot. Sudden temperature changes can crack the glass or ceramic.
This baking process cures the paint fully. It creates a finish that resists dishwasher cycles and hand washing. Without baking, your paint may survive gentle handling but fail under regular use. Always check your paint label first. Some formulas are not oven-safe and will burn or discolor.
After baking, apply a clear sealer for extra protection. Choose a product made for glass or ceramic surfaces. Spray two thin coats over your cured paint. This sealer adds scratch resistance and gives a uniform sheen. Your finished project will look professional and withstand daily use for years.
Sometimes your project needs more than a flat color. You want texture, glow, or heat resistance. Specialty spray paints open up creative possibilities that standard formulas cannot deliver. These products solve specific problems and create distinctive looks for your DIY work.
Metallic spray paint adds shimmer and depth to your project. Tiny metal flakes in the formula catch light from different angles. This finish works well for picture frames, lamp bases, and decorative accents. You can also use metallic paint on furniture hardware to create an upscale look without replacing the pieces.
Hammered finish paint creates a textured pattern that resembles beaten metal. This look hides fingerprints, scratches, and surface flaws effectively. The texture also adds grip, making it practical for toolboxes, workbenches, and equipment housings. Hammered finishes come in various colors, from silver and bronze to black and blue.
Crackle paint produces a vintage, aged appearance. As the paint dries, it forms fine cracks that reveal the base color underneath. You apply a base coat first, then the crackle topcoat. The thicker you apply the crackle layer, the larger the cracks appear. This technique suits furniture flips, picture frames, and craft projects where you want an antique feel.
You can mimic expensive wrought iron furniture with the right spray paint technique. Start with a dark metallic base coat, such as black or dark bronze. Once dry, apply a hammered finish spray paint over the base. The hammered texture creates the dimpled surface that real wrought iron shows. This method transforms plain metal shelving, plant stands, or table legs into pieces that look custom-made. The result costs a fraction of buying actual wrought iron items.
Glow-in-the-dark spray paint absorbs light energy and releases it slowly in darkness. Charge the paint with bright light for several minutes before you expect it to glow. The effect lasts for hours, depending on the product quality and charge time. Use this paint for kids' room ceilings, light switch plates, or safety markings on stairs.
Neon spray paint delivers intense, bright colors that seem to radiate light. These paints work best on white or light-colored surfaces. A white base coat helps neon colors appear vivid and true to their intended shade. Use neon paints for posters, sports equipment, or party decorations. They also work well for safety gear and visibility markings.
Automotive spray paint serves a different purpose than general-purpose formulas. These products resist oil, gasoline, and extreme temperatures. You need them for engine blocks, brake calipers, and other parts that face harsh conditions. Regular spray paint breaks down quickly when exposed to these elements.
Engine enamel creates a tough, chemical-resistant coating. This finish withstands oil spills, fuel splashes, and cleaning solvents. You can choose from various colors to match your vehicle's theme. Many car enthusiasts use engine enamel to paint valve covers, intake manifolds, and other visible engine parts.
Heat destroys ordinary paint quickly. Engine components generate extreme temperatures that cause standard finishes to bubble, peel, and discolor. High-temperature engine enamel resists this damage through special heat-resistant resins. The table below shows how different products compare.
Product | Temperature Resistance |
|---|---|
General engine enamel paints | Up to 500°F |
Rust-Oleum Gas & Oil Resistant Engine Enamel | 2000°F |
Dupli-Color Engine Enamel | 500°F |
VHT High Temperature Engine Enamel | 550°F |
Krylon Automotive Engine Enamel | 500°F |
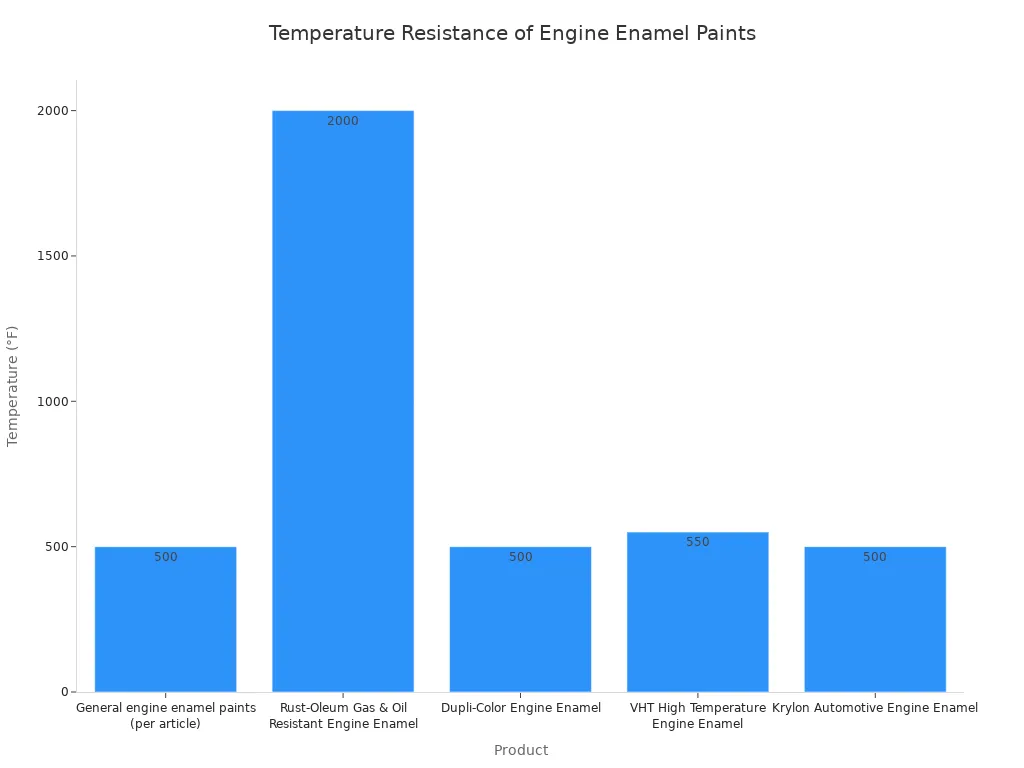
Most engine enamels handle temperatures around 500°F continuously. This range covers typical engine operating temperatures. For extreme applications like exhaust headers or turbochargers, you need a specialized product with higher heat tolerance. Always check the label to match the paint to your specific heat source.
The best spray paint for engine work combines heat resistance with chemical durability. Apply thin coats and allow proper curing time between layers. This process ensures the finish bonds correctly and provides maximum protection. Your engine parts will look great and resist damage for years.
You now know how to match paint type to your surface and setting. Next, you must pick a brand you can trust. The brand matters just as much as the paint type. A good maker makes sure every can works the same way. You avoid issues like color changes, blocked nozzles, or uneven coats between cans from the same line.
Good results depend on steady quality. When you buy two cans of the same color from a trusted brand, they look the same. You can start a job today and finish it next week with no visible difference. Cheap brands often differ between batches. The color you bought last month may look a bit different now. This change ruins jobs that need several cans.
Spray performance also stays steady with quality brands. The pressure inside each can stays even from start to finish. The nozzle gives the same spray pattern for the whole can. You get even coverage without spitting or uneven drops. This steadiness lets you focus on your method instead of fighting bad tools.
Reputable manufacturers ensure consistent quality across batches. Their acrylic aerosol paint gives the same color and spray action from can to can. Hardware shops and industrial buyers trust this steadiness for their daily work.
Quality aerosol paint breaks into fine, even drops when you press the nozzle. This process, called atomization, controls how smooth your finish looks. Even atomization makes a fine mist that lands evenly on your surface. Poor atomization causes spatters and rough texture. You can see the difference on your first pass.
Fast drying saves you time and keeps dust away. A good spray paint dries fast enough that dust and dirt do not stick to the wet surface. Quality spray paint gives both even atomization and fast drying. The formula covers well in fewer coats, cutting your total job time. This efficiency matters for both DIY fans and pros who need steady results.
The best spray paint also sticks well and lasts long. You want a finish that resists chips, fading, and water damage. Quality brands test their products to make sure they work in real conditions. You pay a bit more for this safety, but the results are worth it.
Businesses that sell spray paint face a different task. They need products that fit their brand and what customers expect. OEM (Original Equipment Manufacturer) services let you change labels, packaging, and even color mixes. You build a known product line without owning a factory.
Some manufacturers offer OEM and private label options for businesses that want this flexibility. You can change labels, packaging, color plans, and finish choices to fit your local market. Factory-direct supply keeps prices steady and stock reliable. This setup works well for hardware store chains, industrial suppliers, and brands that want to grow their product lines.
Private label spray paint gives you control over your brand look. You pick the colors, finishes, and can sizes your customers want. Popular can sizes are available for store shelves and industrial use. With steady production quality, you build customer trust in your brand. Each order works the same as the last, cutting complaints and returns.
A good spray paint partner does more than fill cans. They help you plan your product range, test formulas, and deliver steady quality. This partnership lets you focus on marketing and sales while your supplier handles making. Choose a maker with proven certifications and a history of reliable service.
You have reached the decision point. You understand paint chemistry, surface preparation, and durability factors. Now you need to pick the right product for your specific project. This section brings everything together into a clear action plan. You will learn which products perform best for each surface type. You will also understand how your environment and budget affect your final choice.
Consumer testing has identified standout performers for each common surface material. These products have proven their reliability through real-world use and rigorous evaluation. You can trust these recommendations for your next project.
For metal surfaces, Rust-Oleum Stops Rust 5-in-1 Protective Enamel Spray Paint earns the top spot. Testers selected this product for its ease of application, durability, scratch resistance, and rich color coverage. The formula combines primer, rust inhibitor, and enamel topcoat in one can. This all-in-one design simplifies your work while providing strong protection against moisture and corrosion. If you want a premium metallic look, Rust-Oleum Universal Premium Metallic Spray Paint offers another solid option. Krylon COLORmaxx Spray Paint and Primer also delivers dependable results for metal projects. Each of these products handles outdoor conditions well when you prepare the surface properly.
Wood projects benefit from Rust-Oleum 2X Ultra Cover spray paint. This product works exceptionally well for furniture flips, home décor, and craft projects. The manufacturer also recommends Rust-Oleum Universal Spray Paint for wood surfaces. Your choice between these two depends on the finish you want. Universal Spray Paint provides a premium metallic appearance. 2X Ultra Cover delivers a traditional, smooth finish with excellent coverage. Both options dry quickly and bond well to properly primed wood. For most DIY furniture projects, 2X Ultra Cover offers the best balance of quality and value. This product stands as the best spray paint for wood when you need reliable, consistent results.
Krylon Fusion All-In-One Spray Paint leads the category for plastic surfaces. This product carries a no-peel guarantee and bonds directly to plastic without primer. Testers noted its adhesion strength is five times greater than standard formulas. The paint flexes with the plastic as temperatures change, preventing cracks and peeling. Rust-Oleum Paint for Plastic Spray serves as a strong runner-up. This option also requires no primer or sanding while providing superior adhesion and weather protection. Both products eliminate the extra preparation steps that plastic usually demands. For your next plastic project, Krylon Fusion stands as the best spray paint for plastic available on the market.
Your project location determines how much protection your paint must provide. Indoor items face gentle conditions with stable temperatures and low moisture. Outdoor items battle direct sunlight, rain, and temperature swings. These differences change which product you should select.
Indoor projects allow you to prioritize appearance over maximum toughness. You can choose satin or matte finishes that look modern and elegant. Standard acrylic formulas provide adequate protection for furniture, décor, and crafts that stay inside. You save money without sacrificing visual quality.
Outdoor projects demand maximum durability. Gloss finishes create a tighter surface that repels moisture effectively. You need rust-inhibitive primers for metal and UV-resistant topcoats for any material. The table below summarizes the key differences.
Factor | Indoor | Outdoor |
|---|---|---|
Primary concern | Appearance | Protection |
Recommended finish | Satin or matte | Gloss |
Key additive needed | None | UV blockers, rust inhibitors |
Expected lifespan | 5+ years | 2-10 years depending on material |
Spray paint prices vary widely across brands and product lines. Budget options cost less upfront but often require extra coats or more frequent repainting. Premium products cost more per can but deliver better coverage and longer-lasting results.
Invest in premium spray paint when your project faces harsh conditions or heavy use. Outdoor metal furniture, children's toys, and kitchen cabinets all benefit from higher-quality formulas. These products resist chipping, fading, and moisture damage far better than budget alternatives. You also save money over time because you repaint less frequently.
Budget spray paint works fine for temporary projects or indoor decorative pieces. If you plan to repaint soon or the item faces minimal wear, a cheaper option may suffice. However, you should never skip primer or surface preparation to save money. Proper prep ensures any spray paint performs at its best. Choose quality products for projects that matter, and you will enjoy professional results that last for years.
Start with your surface material. Then consider where the item will live. Finally, choose the finish that matches both. This simple sequence guides every smart spray paint purchase.
Never skip preparation. Cleaning, sanding, and priming determine your final result more than the brand you select. These steps take extra time but prevent peeling, rust, and faded colors later.
You now possess the knowledge to choose correctly. Walk through any hardware store with confidence. Tackle a simple craft or restore an entire furniture piece. Your projects will look professional and endure for years. The right spray paint, applied to a properly prepared surface, transforms ordinary items into lasting creations.
Standard spray paint often fails on plastic. You need a product made for plastic or a separate adhesion promoter. Lightly sanding the surface also improves grip and prevents peeling.
Read your can label for exact times. Acrylic dries in 2 to 4 hours. Enamel takes 8 to 24 hours. Wait the full time between coats to prevent wrinkling or lifting.
Yes, bare metal needs primer. Primer bonds to the smooth surface and gives your topcoat something to hold. It also includes rust blockers that stop corrosion before it starts.
Choose gloss. Gloss finishes create the tightest surface that resists moisture and UV rays. This keeps your project looking newer for longer compared to satin or matte.
Most spray paint works best between 50°F and 85°F. Cold temperatures thicken paint and cause uneven coverage. Wait for a warmer day or move your project indoors.
Let the drip dry completely. Sand it smooth with fine-grit sandpaper. Clean away the dust. Apply a thin coat over the sanded area and blend it into the surrounding finish.
Not always, but a clear coat adds extra protection for your spray paint finish against scratches and UV fading. Use it on outdoor projects or items that get heavy daily use and frequent touching.

